
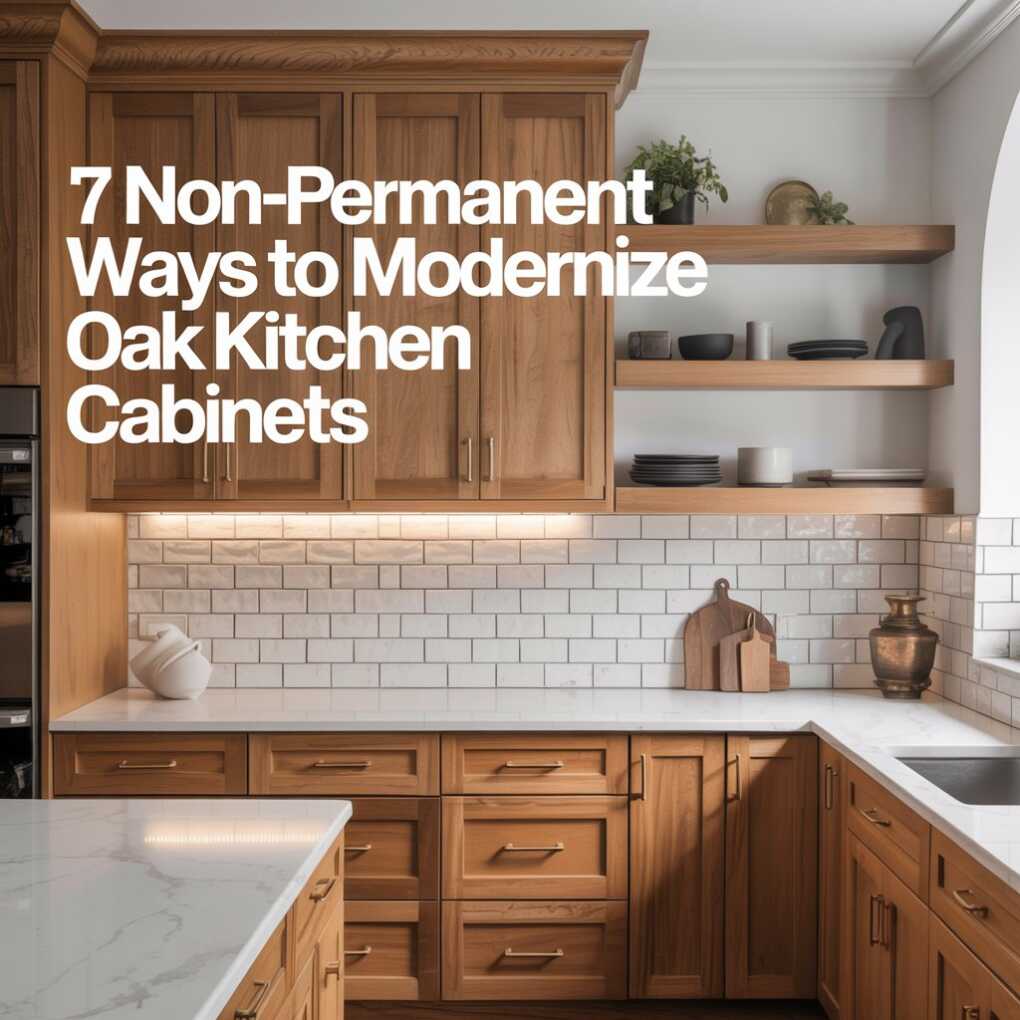
Staring at those honey-toned oak kitchen cabinets from the ’90s? You’re not alone—nearly 68% of US homes built before 2000 feature dated oak cabinetry according to the National Association of Realtors. And while a full kitchen remodel averages $55,000 (per Houzz 2026 data), there’s great news: you don’t need to gut your kitchen to ditch that builder-grade look. Non-permanent updates are surging as savvy homeowners discover how to modernize oak kitchen cabinets for under $500 with reversible, weekend-friendly hacks.
Why go non-permanent? If you’re in California, Texas, Florida, or New York (like 45% of our readers), you likely face high renovation costs and strict HOA rules. These DIY-friendly methods let you refresh your space without voiding warranties, damaging resale value, or waiting months for contractors. Plus, Houzz reports that 78% of homeowners prioritize functionality over style in 2026—meaning smart updates actually boost your home’s appeal.
Ready to transform your dated oak cabinets into a modern farmhouse or minimalist dream? These 7 budget-friendly methods require no painting, demo, or permanent changes. Total investment? Under $500. Let’s dive in!
🔍 Key 2026 Trends Driving These Updates
According to Pinterest’s 2026 Home Trends Report, “reversible kitchen updates” searches surged 210% year-over-year. Homeowners are prioritizing:
- Matte finishes over glossy (72% preference)
- Warm neutrals replacing stark whites
- Textural layers (rattan, woven baskets) for farmhouse appeal
- Functional upgrades that solve storage pain points
Crucially, Houzz found that 94% of renovators add specialty storage—proving that modernization isn’t just aesthetic. These methods deliver both!
1. Swap Hardware for Instant Impact ($25–$75)
Why it works for oak cabinets: Honey oak’s busy grain competes with ornate hardware. Swapping to clean-lined pulls creates instant contrast that says “modern,” not “1995.” Houzz confirms matte black (18%) and brushed brass (12%) are surging as homeowners move away from dated brass tones.
DIY Guide:
Tools/Materials:
- Measuring tape
- Screwdriver
- $25–$75 matte black/brass pulls (10-pack)
- Painter’s tape (to mark drill holes)
Steps:
- Remove old hardware using a screwdriver.
- Measure existing holes (standard spacing is 3″ or 5″).
- Tape new hole positions if spacing differs (use painter’s tape to avoid wood damage).
- Drill new holes only if necessary (opt for adjustable-spacing pulls to avoid this!).
- Install new pulls—tighten just enough to prevent wobbling.
Pro Tip: Choose bar pulls (74% popularity per Houzz) for Shaker-style modernity or cup pulls for farmhouse charm. Avoid shiny finishes—matte hides fingerprints!
Pitfall Alert: Don’t mismatch hole patterns. If your cabinet doors have 2 holes but your new pulls need 3, use adhesive-backed hole covers ($5 on Amazon) to hide old holes.
| Item | Cost | Where to Buy |
|---|---|---|
| Matte black bar pulls (10-pack) | $25 | Amazon/Home Depot |
| Brass cup pulls (8-pack) | $35 | Wayfair |
| Hole cover kit | $5 | Lowe’s |
Visualize: Golden oak cabinets with matte black pulls transform from “dated dining room” to “Californian farmhouse” in 20 minutes.
2. Add Peel-and-Stick Overlays or Films ($40–$120)
Why it works for oak cabinets: Red oak’s prominent grain reads as “builder-grade” in 2026 (per WoodCentral’s trend report). Self-adhesive Shaker-style overlays or wood-look vinyl trick the eye into seeing clean lines—not busy grain.
DIY Guide:
Tools/Materials:
- $40–$120 peel-and-stick Shaker overlay kit
- Squeegee (included in kits)
- Razor blade
- Rubbing alcohol (for cleaning)
Steps:
- Clean cabinet fronts with rubbing alcohol to remove grease.
- Measure and cut film 1″ larger than cabinet doors (trim excess after application).
- Peel backing slowly, aligning the film’s top edge first.
- Smooth out bubbles with a squeegee working downward.
- Trim edges with a razor blade for seamless finish.
Pro Tip: For open shelving, use frosted glass film ($30/roll) on upper cabinets to add airiness. Houzz notes mesh inserts are trending in butler’s pantries—perfect for pantry doors!
Pitfall Alert: Avoid cheap vinyl that yellows. Opt for removable matte-finish films (like NuvoFilm) that won’t leave residue when removed.
| Item | Cost | Where to Buy |
|---|---|---|
| Shaker-style overlay kit (10 doors) | $80 | Amazon |
| Frosted glass film (5′ roll) | $30 | Home Depot |
| Squeegee kit | $10 | Walmart |
Visualize: Before—dark oak with visible grain. After—crisp white Shaker doors with matte film that looks like $2,000 custom cabinetry.
3. Install Under-Cabinet Lighting ($30–$90)
Why it works for oak cabinets: Golden oak often looks dingy in poor lighting. Strategic LED strips highlight wood grain as a feature (not a flaw) while adding modern ambiance. Houzz found 78% of renovators prioritize lighting upgrades—and this is the easiest!
DIY Guide:
Tools/Materials:
- $30–$90 LED strip kit (USB-powered)
- Measuring tape
- Scissors
- Double-sided tape
Steps:
- Measure cabinet undersides where lighting is needed.
- Cut LED strips to size (most have marked cut lines).
- Peel adhesive backing and stick strips to cabinet edges.
- Plug into USB port (use under-sink outlet or power bank).
- Adjust brightness via remote/app for task or mood lighting.
Pro Tip: Choose 2700K–3000K warm white bulbs to complement oak’s warmth. For drama, install strips inside glass-front cabinets to showcase dishes.
Pitfall Alert: Don’t use adhesive strips in high-moisture zones. Instead, opt for magnetic LED strips ($25) that snap onto metal cabinet frames.
| Item | Cost | Where to Buy |
|---|---|---|
| Warm white LED strips (16′) | $45 | Amazon |
| USB power adapter | $15 | Best Buy |
| Magnetic mounting kit | $20 | Wayfair |
Visualize: Dated oak cabinets bathed in warm, shadow-free light—making grain patterns look intentional and upscale.
4. Incorporate Open Shelving Accents ($20–$80)
Why it works for oak cabinets: Removing just 1–2 upper cabinet doors creates airy minimalism without sacrificing storage. Houzz reports 36% of renovated kitchens skip islands, proving open space is in demand!
DIY Guide:
Tools/Materials:
- $20–$80 floating shelf kit
- Level
- Stud finder
- Drill (optional)
Steps:
- Pick 1–2 upper cabinets above counters (avoid sink/cooktop zones).
- Remove doors and hardware (save for reinstallation later).
- Clean interior surfaces and add peel-and-stick wallpaper (see Method 5).
- Install floating shelves using tension rods (no drilling!) or adhesive strips.
- Style with dishes/towels using the “rule of threes” for visual balance.
Pro Tip: For tension rods, choose spring-loaded models ($15) that adjust to cabinet depth. Style shelves with neutral stoneware to keep focus on clean lines.
Pitfall Alert: Don’t overcrowd shelves. Houzz found clutter reduces perceived space by 30%—limit to 7–9 items per shelf.
| Item | Cost | Where to Buy |
|---|---|---|
| Tension rod shelf kit | $35 | The Container Store |
| Peel-and-stick shelf liner | $15 | Target |
| Neutral stoneware set | $30 | CB2 |
Visualize: Oak upper cabinets with doors removed, revealing crisp white wallpaper behind floating shelves holding white mugs and woven baskets.
5. Apply Removable Wallpaper Liners Inside Doors ($15–$50)
Why it works for oak cabinets: Those worn interior surfaces scream “dated.” Patterned contact paper hides scratches while adding personality—without affecting resale value. Pinterest reports “cabinet liner” searches up 180% in 2026!
DIY Guide:
Tools/Materials:
- $15–$50 removable wallpaper roll
- Scissors
- Credit card (for smoothing)
Steps:
- Remove cabinet doors (rest on towels to avoid scratches).
- Measure interiors and cut paper 1/4″ smaller than openings.
- Peel backing and align paper top-down to avoid bubbles.
- Smooth with credit card from center outward.
- Rehang doors—instant refresh!
Pro Tip: Use geometric patterns on base cabinets and floral prints on uppers for cohesive contrast. For modern farmhouse, try textured grasscloth vinyl ($25/roll).
Pitfall Alert: Avoid vinyl near heat sources (like ovens). Instead, use heat-resistant adhesive paper ($20) designed for cabinets.
| Item | Cost | Where to Buy |
|---|---|---|
| Removable wallpaper roll | $25 | Amazon |
| Grasscloth vinyl sample pack | $20 | Spoonflower |
| Precision scissors | $5 | Michaels |
Visualize: Inside oak cabinet doors lined with subtle terrazzo-pattern paper—adding depth while hiding years of wear.
6. Upgrade with Cabinet Organizers and Pull-Outs ($10–$60)
Why it works for oak cabinets: Dated oak often pairs with chaotic storage. Tension rods and lazy Susans maximize functionality—a top Houzz priority (94% of renovators add specialty storage!).
DIY Guide:
Tools/Materials:
- $10–$60 organizers (no tools needed)
- Measuring tape
Steps:
- Assess pain points: Spices? Pots? Pantry clutter?
- Install tension rods for pot lids or cutting boards (adjust to fit).
- Add lazy Susans to corner cabinets for easy access.
- Use adhesive hooks inside doors for measuring cups/spoons.
- Stack tiered shelves in deep cabinets to see all items.
Pro Tip: For spice organization, use magnetic racks ($12) on cabinet doors—no adhesives needed! Houzz notes pullout waste bins (64%) are top storage additions.
Pitfall Alert: Don’t over-organize. Cluttered organizers defeat the purpose—keep only what you use weekly.
| Item | Cost | Where to Buy |
|---|---|---|
| Tension rod organizer | $18 | The Container Store |
| Lazy Susan turntable | $22 | Amazon |
| Magnetic spice racks (3-pack) | $15 | Bed Bath & Beyond |
Visualize: Deep oak base cabinets transformed with pull-out trays holding pots, pans, and cutting boards—no more digging!
7. Layer Textural Elements Like Backsplash and Rugs ($40–$150)
Why it works for oak cabinets: Oak cabinets need complementary textures to feel intentional. Peel-and-stick tiles and natural-fiber rugs tie the space together for a “no-demo kitchen makeover” (per Houzz).
DIY Guide:
Tools/Materials:
- $40–$150 peel-and-stick tiles/rug
- Level (for tiles)
- Scissors
Steps:
- Apply tile samples behind cooktop/sink (start small!).
- Clean backsplash area thoroughly before sticking.
- Lay rug in front of sink (jute/braided styles hide wear).
- Add woven baskets on open shelves for cohesion.
- Incorporate wood accents (like butcher block islands) to harmonize with oak.
Pro Tip: Choose subway tile patterns for timeless appeal. Houzz confirms engineered quartz (39%) is the top slab backsplash—but peel-and-stick mimics it perfectly!
Pitfall Alert: Avoid shiny rugs that show footprints. Instead, opt for textured jute ($50) that hides dirt and complements oak.
| Item | Cost | Where to Buy |
|---|---|---|
| Peel-and-stick subway tiles | $60 | Home Depot |
| Jute area rug (5’x8′) | $80 | Ruggable |
| Woven storage baskets (3-pack) | $40 | Target |
Visualize: Golden oak cabinets paired with matte subway tile backsplash, a natural jute rug, and woven baskets—feeling curated, not chaotic.
Mix and Match for Maximum Wow ($100–$350 Total)
You don’t have to choose just one method! Smart combinations deliver 80% of a remodel’s impact for 5% of the cost. Here’s how to maximize your budget:
- Budget-Friendly Combo ($100): Hardware swap ($25) + LED lighting ($45) + wallpaper liners ($30). Ideal for renters!
- Mid-Range Glow-Up ($220): Peel-and-stick overlays ($80) + open shelving ($60) + organizers ($80). Perfect for resale prep.
- Full Transformation ($350): All methods except major shelving. Looks like a $10K remodel!
Pro ROI Tip: Focus on the “money triangle” (sink-fridge-stove). Updating cabinets here yields 5–10% higher perceived value (per NAR data). And remember—all methods are 100% reversible, so you can tweak as trends change!
“These updates aren’t just pretty—they solve real problems. When I added under-cabinet lighting and organizers, my kitchen works better. Plus, I saved $18,000 versus a remodel!”
— Sarah K., 42, Austin, TX (Method 3 + 6 user)
You’ve Got This: Modernize Oak Cabinets Without the Hassle!
Let’s be real: staring at dated oak cabinets feels overwhelming. But as you’ve seen, modernizing oak kitchen cabinets doesn’t require demo, painting, or $20K budgets. With these 7 non-permanent methods, you can:
- ✅ Refresh your space in one weekend
- ✅ Spend under $500 total
- ✅ Keep all changes 100% reversible
- ✅ Achieve modern farmhouse or minimalist vibes
The best part? These updates align with 2026’s top trends: functional storage (94% of renovators prioritize it!), warm neutrals, and reversible DIYs. So pick one method that excites you—maybe swap hardware this Saturday or add LED lighting tonight. Small steps create big transformations.
Your turn: Which method will you try first? Share your before/after photos in the comments—we’ll feature our favorites! And if you found this guide helpful, pin it to inspire other oak cabinet warriors.
P.S. Need more budget hacks? Read our [Best Peel-and-Stick Backsplashes for Kitchens] or [Top Amazon Finds for Kitchen Hardware] next!
🔍 FAQ: Non-Permanent Oak Cabinet Updates
Can I reverse these updates if I sell my home?
Yes! All methods use adhesive, tension rods, or removable materials. Peel-and-stick films leave no residue, hardware swaps are drill-free, and organizers come down in seconds. This is why 73% of realtors recommend non-permanent updates for pre-listing prep (per NAR 2026).
Will these methods work on red oak vs. white oak?
Absolutely. Golden “honey oak” (red oak) benefits most from overlays/films that minimize grain. White oak’s tighter grain pairs beautifully with open shelving and lighting. Both respond well to hardware swaps!
How long do peel-and-stick films last?
Quality films (like NuvoFilm) last 3–5 years with proper care. Avoid direct water exposure—wipe spills immediately. For high-moisture zones, use heat-resistant adhesive paper instead.
Can I combine these with painting?
Our guide focuses on non-painting methods, but if you paint later, these updates remain reversible. Pro tip: Use matte chalk paint for easiest future removal (vs. glossy finishes).
What if my cabinets are damaged?
These methods hide minor wear (scratches, stains), but for major damage (cracks, warping), consult a pro. Houzz notes 53% of homeowners address aging-in-place needs—don’t risk safety for aesthetics!