
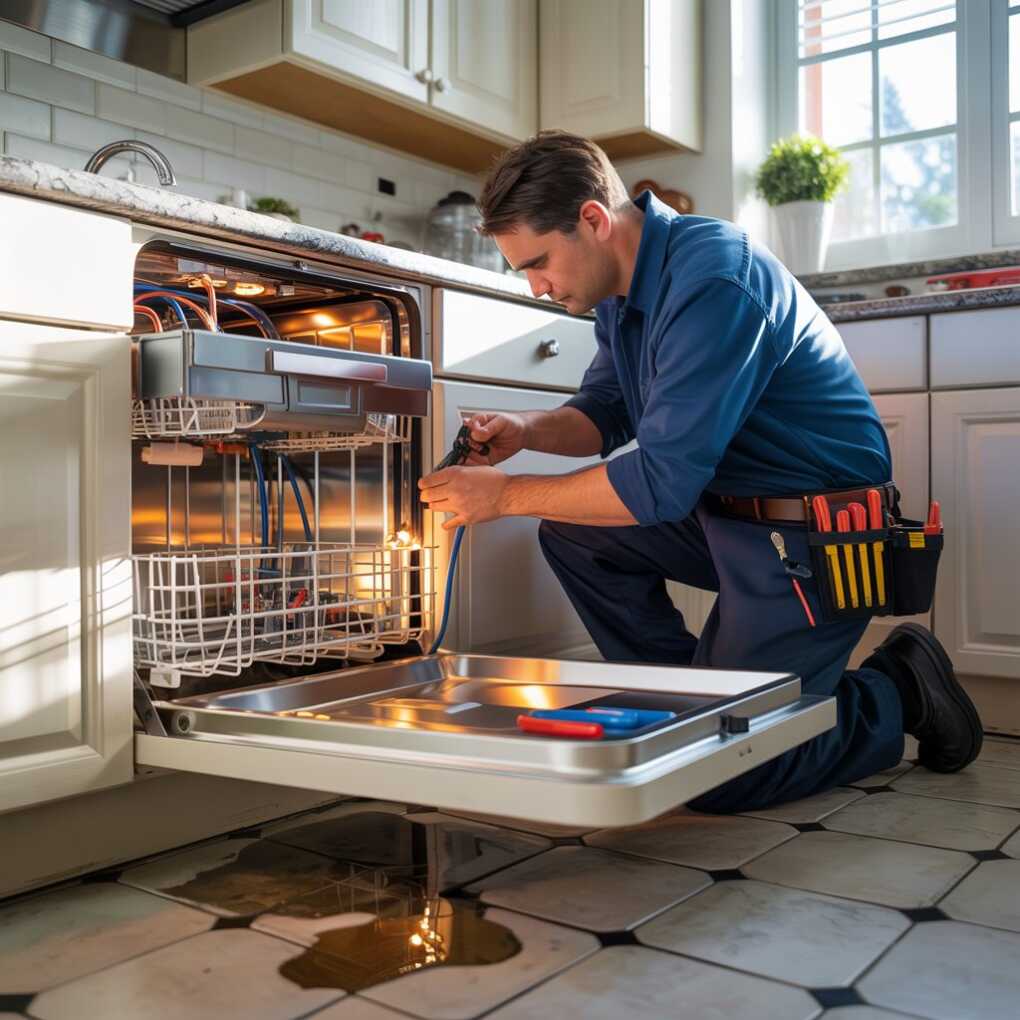
Dishwashers are one of those household appliances we take for granted until they start acting up. You’ve loaded it up after a big family dinner, hit the start button, and come back to find your plates still smeared with food residue or glasses foggy with soap scum. It’s frustrating, right? If your dishwasher isn’t cleaning dishes properly, it could be due to a range of issues, from simple clogs to more complex mechanical problems. Before you panic and think about replacing the whole unit, there are plenty of DIY fixes you can try at home. And if you’re in the Burnaby area and need expert help, consider reaching out for appliance repair Burnaby BC to get things sorted quickly. In this guide, we’ll walk through step-by-step troubleshooting to help you diagnose and resolve the most common culprits.
I’ve dealt with my fair share of dishwasher woes over the years—nothing ruins a relaxing evening like scrubbing dishes by hand when the machine should be doing the work. The good news is that many problems stem from basic maintenance oversights rather than major breakdowns. We’ll cover everything from checking water flow to deep-cleaning components, and I’ll throw in some tips to prevent future headaches. By the end, you’ll have a clearer idea of whether it’s a quick fix or time to call in the pros.
Understanding the Basics: Why Isn’t Your Dishwasher Cleaning?
First things first, let’s get a handle on how dishwashers work. At its core, a dishwasher uses hot water, detergent, and mechanical action from spray arms to blast away grime. If any part of this process falters, your dishes won’t come out sparkling. Common reasons include insufficient water pressure, blocked spray arms, dirty filters, or even improper loading habits.
Think about it: if the water isn’t getting hot enough—ideally around 120-140°F—or if there’s not enough of it filling the tub, the detergent won’t activate properly, leaving residue behind. Hard water minerals can build up over time, coating heating elements and reducing efficiency. Or maybe it’s something as simple as using the wrong type of detergent; those pods might be convenient, but if they’re not dissolving fully, they’re not helping.
Start by running a diagnostic cycle if your model has one. Newer dishwashers often have error codes that pop up on the display panel. For instance, an E1 code on some brands might indicate a water inlet issue. If yours is older, you’ll have to rely on manual checks. Grab your owner’s manual—it’s your best friend here—and note the model number for any part replacements you might need.
One quick test: Run an empty cycle and listen for unusual noises, like grinding or humming, which could point to a failing pump. Also, check the water temperature by running the faucet nearest the dishwasher; if it’s not hot, the issue might be with your home’s water heater rather than the appliance itself.
Step 1: Inspect and Clean the Spray Arms
The spray arms are the unsung heroes of your dishwasher, spinning and shooting water jets to reach every nook and cranny. If they’re clogged, your dishes won’t get the thorough rinse they need. Over time, food particles, grease, and mineral deposits can block the tiny holes, reducing water pressure and leaving spots or film.
To fix this, unplug the dishwasher or turn off the circuit breaker for safety. Remove the lower rack to access the bottom spray arm—it’s usually held in place by a central nut or clip. Lift it out and inspect the holes. Use a toothpick or small wire to poke out any debris; avoid anything sharp that could damage the plastic. For the upper arm, you might need to remove the middle rack too.
Rinse everything under hot water, and if buildup is stubborn, soak the arms in a mixture of white vinegar and warm water for an hour. Vinegar’s acidity breaks down lime scale effectively without harsh chemicals. Reassemble and run a test cycle with a cup of vinegar on the top rack to flush the system.
I remember helping a neighbor with this once; her spray arms were so gummed up with years of neglect that water was barely trickling out. After a good clean, it was like a brand-new machine. If the arms are cracked or worn, replacements are inexpensive and easy to find online—just match your model.
Step 2: Check and Maintain the Filters
Filters are another key component that often gets overlooked. Most modern dishwashers have a filter at the bottom of the tub that traps food scraps to prevent them from recirculating. A dirty filter means dirty water is being reused, which explains those greasy residues on your glasses.
Locate the filter—it’s typically a cylindrical or flat mesh screen under the lower spray arm. Twist or pull it out according to your manual’s instructions. Rinse it thoroughly under running water, scrubbing gently with a soft brush if needed. For deeper cleans, soak in soapy water or vinegar.
If your dishwasher has a garbage disposal-like chopper blade, check that too; it can get jammed with bones or large debris. Clear any obstructions carefully to avoid injury. Reinstall the filter securely, as a loose one can cause leaks.
Regular maintenance is crucial here. I aim to clean mine every month, especially after heavy use like holiday cooking. If you notice a foul odor, that’s a sign the filter needs attention pronto—bacteria love to thrive in those moist, food-filled environments.
Step 3: Ensure Proper Water Inlet and Drainage
Water issues are a top reason for poor cleaning performance. Start with the inlet valve, which controls water flow into the dishwasher. If it’s faulty, the tub might not fill adequately, leading to weak sprays.
Check the water supply line under your sink; make sure the valve is fully open and the hose isn’t kinked. Inspect for leaks or corrosion. To test inlet pressure, run a cycle and pause it mid-fill to see if water levels reach the heating element.
Drainage problems can also masquerade as cleaning issues. If old water isn’t draining fully, fresh cycles start with contaminated H2O. Clear the drain hose by disconnecting it from the sink or garbage disposal and flushing with a garden hose. Use a plumber’s snake for stubborn clogs.
Hard water? Install a water softener or use rinse aids designed for mineral-heavy areas. These products help prevent spotting and improve overall cleaning. In my experience, switching to a high-quality rinse aid made a world of difference in a hard-water region.
Step 4: Examine the Detergent Dispenser and Heating Element
The detergent dispenser might seem minor, but if it’s not opening at the right time or is clogged, soap won’t distribute evenly. Clean it with a damp cloth and ensure the lid snaps shut properly. Test by running a cycle with the door open (if safe) to watch the release.
The heating element at the bottom dries dishes and boosts cleaning by maintaining hot water. If it’s coated in scale or burned out, dishes stay wet and soapy. Descale with a citric acid cleaner or vinegar run. For testing, use a multimeter to check continuity—if there’s none, it’s time for a replacement.
Safety note: Always disconnect power before probing electrical parts. If you’re not comfortable with tools, this is where pros come in handy.
Advanced Troubleshooting: Pumps, Sensors, and More
If basic fixes don’t cut it, dig deeper. The circulation pump pushes water through the system; a failing one might hum but not spray. Access it by tipping the dishwasher back (with help) and removing the bottom panel. Look for debris or test with a multimeter.
Door switches and float sensors ensure safe operation. A stuck float can prevent filling, mimicking a cleaning problem. Clean or replace as needed.
Control board issues are rarer but possible in older models. Error codes often point here, but repairs can be pricey—sometimes it’s better to upgrade.
When to Call a Professional
Not every fix is DIY-friendly. If you’ve tried the above and dishes still aren’t clean, it might be a deeper issue like a worn impeller or electrical fault. Professionals have the tools and expertise to diagnose quickly, saving you time and potential costly mistakes.
For residents in the Vancouver area, reliable Vancouver appliance repair services can handle everything from part replacements to full overhauls. They’ve seen it all and can often fix things on the spot.
Preventing Future Dishwasher Problems
Prevention beats cure. Scrape plates before loading, but don’t pre-rinse—modern dishwashers are designed for that. Use the right cycle: heavy for pots, normal for everyday.
Run monthly clean cycles with specialized cleaners. Keep an eye on seals and gaskets for wear to avoid leaks.
Load properly: Don’t block spray arms, and alternate item sizes for even coverage.
In wrapping up, tackling a dishwasher that’s not cleaning properly doesn’t have to be overwhelming. With these steps, you can often restore it to peak performance without much hassle. Remember, regular upkeep is key to longevity. If all else fails, don’t hesitate to seek professional help—it’s worth it for the peace of mind and spotless dishes.