You know the feeling: you buy a flush mount light, hold the box up to the ceiling, and suddenly it looks either tiny like a coaster or huge like a serving tray. That happens because “right size” is not just about diameter. It is about three things working together: the room’s footprint, the ceiling height, and the brightness the fixture can actually deliver where you live, cook, walk, and get ready in the morning. Flush mounts are especially useful in lower-ceiling rooms because they sit tight to the ceiling and keep the room feeling open rather than crowded.
Key takeaway: if your ceiling is around 8 feet or lower, a flush mount is usually the safest, easiest place to start. Then you can size the fixture by room dimensions, and only after that check lumens so the light does not just look right, but also work right. That simple order saves money, avoids returns, and prevents the two classic mistakes: a fixture that looks lost in the room or one that throws harsh glare because you tried to compensate with too much brightness in too small a body. Visual Comfort, Lumens, JM, and MH Lighting all point to the same sizing rule of thumb: start with room measurements first, then adjust for height and function.
Why the “right size” feels so different from room to room
A 16-inch flush mount can feel perfect in a small bedroom and totally underpowered in a kitchen of the same square footage. Why? Because the room’s job changes everything. A bedroom can be softer and calmer. A kitchen has counters, shadows, cabinets, and real tasks. A hallway is long and narrow, so one centered fixture may technically fit but still leave the ends looking gloomy. That is why the best guide is not “pick one popular size and hope.” The best guide is “measure, match, then reality-check.” The room’s purpose matters just as much as the tape measure. DOE’s current home-lighting guidance makes the same point in plain language: more light is not automatically better, and the amount and quality of light should match the function of the space. “`
There is also an energy angle here. The U.S. Department of Energy says lighting still accounts for about 15% of an average home’s electricity use, so choosing an efficient fixture that is correctly sized is not just a style decision. It affects bills, comfort, and how often you need to swap products later. DOE also says residential LEDs, especially ENERGY STAR-rated products, use at least 75% less energy and can last up to 25 times longer than incandescent lighting. “`
Formula 1: your fastest size check for fixture diameter
Formula: Fixture diameter in inches = room length in feet + room width in feet
This is the easiest, most useful shopping shortcut for a flush mount. Measure the room’s length and width in feet, add the two numbers, and use that total as your starting diameter in inches. It is a rule of thumb used across several lighting guides, including Visual Comfort, Lumens, JM, and MH Lighting. It is not a law, and you can shift a few inches up or down for style, but it gives you a strong center point fast. “`
Everyday example: if your guest room is 10 feet by 12 feet, then 10 + 12 = 22. Your starting point is a flush mount around 22 inches wide. If the room is packed with tall wardrobes, a chunky fan, or dark walls, you may want to stay near that full number. If the room is bright, minimal, and mostly used for sleeping, you can often step down a bit without the light looking silly.
| Method | What you measure | Typical time | Best use |
|---|---|---|---|
| Diameter rule | Room length + width | 2 minutes | Fast first filter when shopping online |
| Ceiling check | Ceiling height | 30 seconds | Deciding flush mount vs hanging fixture |
| Brightness check | Room area + fixture lumens | 3 minutes | Avoiding dim kitchens and overlit bedrooms |
Key takeaway: use the diameter rule first because it prevents the most visible mistake. People often obsess over finish, shade, or smart features too early. But if the scale is off, the room looks wrong before you even turn the light on. “`
When flush mount is the better call than a hanging light
For rooms with ceilings at or below 8 feet, guides from Visual Comfort and Lumens both recommend leaning toward flush or semi-flush fixtures instead of pendants or chandeliers. That is not because hanging lights are bad. It is because clearance and proportion get awkward fast. Flush mounts keep the visual line cleaner, protect headroom, and usually spread ambient light more evenly across smaller rooms. “`
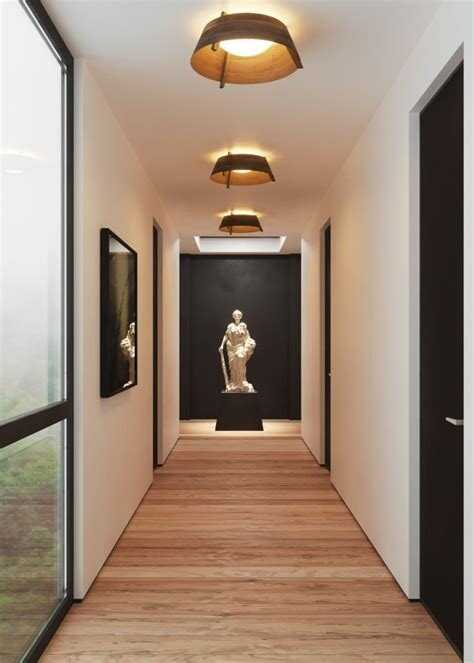
Picture three common situations. In a rental hallway, you probably want a slim, low-profile light that brightens the path without drawing attention to a low ceiling. In a busy family kitchen, you want the fixture to disappear visually but still cover the room’s full width. In a bathroom, you want the size to feel balanced and the fixture to carry the right moisture rating for the location. Same category of light, very different priorities.
“`
Room-by-room starter sizes you can actually use
The chart below is a practical starter table built from the diameter rule and adjusted for how flush mounts are usually used in real homes. Think of it as a smart first pass, not a rigid code book. “`
| Room | Common room size | Start diameter | When to size up or split fixtures |
|---|---|---|---|
| Hallway / entry | 4×8 ft to 6×10 ft | 12–16 in | Use 2 fixtures if the hall is long rather than 1 oversized disc |
| Bathroom | 5×8 ft to 8×10 ft | 13–18 in | Size up if the room is dark or has no vanity lighting |
| Bedroom | 10×12 ft to 12×14 ft | 20–26 in | Stay a little smaller for a calm look; add lamps if needed |
| Kitchen | 10×12 ft to 12×16 ft | 22–28 in | Split light sources if counters and cabinets create shadows |
| Laundry / utility | 6×8 ft to 8×10 ft | 14–18 in | Go brighter rather than decorative |
One more practical note: long rooms often fool people. A single giant flush mount in the middle rarely fixes a long hallway or galley-like space. It just makes the center bright and the ends sad. In those layouts, two smaller fixtures usually feel more intentional and more comfortable. “`
Formula 2: the brightness check that stops you buying a pretty but useless fixture
Formula: Required lumens = room square footage × recommended footcandles
If “footcandles” sounds technical, think of it as how much light reaches the surfaces where you actually live. The lumen method is widely used in lighting design, and both Alcon’s guide and Super Bright LEDs’ IES-based residential guide explain it in a homeowner-friendly way. DOE also reminds shoppers to buy by lumens, not watts, because lumens tell you brightness while watts only tell you energy use. “`
Simple room targets from the IES-based consumer summary: living room around 20 footcandles, kitchen general lighting around 40 footcandles, bathroom general lighting around 30 footcandles. That means a 100-square-foot living room starts around 2,000 lumens, a 192-square-foot kitchen starts around 7,680 lumens for general lighting, and an 80-square-foot bathroom starts around 2,400 lumens before vanity task lighting is added.
Everyday example: your bathroom is 8 feet by 10 feet, so the area is 80 square feet. If you use the 30-footcandle starting point, 80 × 30 = 2,400 lumens. That does not always mean one giant ceiling light. It might mean one ceiling fixture plus good vanity light. That is the hidden trick: sometimes the “right size” flush mount is not the biggest one you can fit. It is the one that handles ambient light while task lights do the close-up work.
Key takeaway: when a flush mount feels too small in daily use, the problem is often not the diameter alone. It is that you expected one fixture to do the job of a layered lighting plan.
| Current product example | Power | Light output | Why it matters |
|---|---|---|---|
| IHT LIGHTING IL-15W-DW-ND V2 | 15.0 W | 2100 lm | Shows how much brightness a compact surface-mount can deliver today |
| ConTech CY3T340K12D1CM-P | 19.6 W | 2602 lm | Useful reference for medium-bright kitchens, utility rooms, entries |
| Green Creative INFTP6/8CCT3S/DIM120V | 16.0 W | 2000 lm | Current qualified example with white-light tuning and wet-location use |
The point of that table is not “buy one of these exact models.” The point is this: current ENERGY STAR-qualified listings already show that slim, efficient, surface-related LED products can deliver roughly 2,000 to 2,600 lumens at around 15 to 20 watts, and some current qualified examples also include features like dimming, white-light tuning, or wet-location suitability. That means you can shop smarter instead of guessing from diameter alone. “`
Three real-life scenarios that make the sizing choice easier
Scenario 1: the dark hallway. You have a narrow 5×14-foot hallway. The diameter formula gives you 19 inches, and that looks tempting. But the shape of the room matters more than the raw total. Two smaller flush mounts spaced along the hall will usually feel better than one 19-inch light in the middle. You get more even coverage, fewer gloomy ends, and a cleaner look. “`
Scenario 2: the peaceful bedroom. Your room is 11×13 feet, so your formula number is 24 inches. That is a solid target. But if you already use bedside lamps, blackout curtains, and warm finishes, you may prefer a cleaner 20-to-22-inch fixture with dimming. The room still looks balanced, and the smaller size can feel calmer overhead. DOE’s current consumer guidance also recommends dimmers and controls as a simple way to save energy and tune brightness instead of over-lighting a room all the time.
Scenario 3: the hard-working kitchen. Your kitchen is 12×16 feet, so the diameter rule points to 28 inches. That may be visually correct, but if upper cabinets and dark counters create shadows, one flush mount might still feel weak. This is where the lumen formula saves you. If the room needs far more brightness than a single decorative flush mount can provide comfortably, add under-cabinet or task lighting rather than forcing one oversized ceiling fixture to do everything. DOE explicitly recommends task lights where needed and says not every room benefits from simply adding more ambient light.
Three common mistakes people make, and the fast fix for each one
Mistake 1: measuring only one side of the room. A lot of people look at width, ignore length, and end up with a fixture that feels off-center in the room’s proportions. Fast fix: always measure both sides and use the formula. It takes an extra minute and saves you from buying a light that looks lost. “`
Mistake 2: judging by watts instead of lumens. This is still incredibly common! DOE and the FTC both push the same shopping message: compare brightness by lumens, then use wattage to understand energy use and yearly cost. The Lighting Facts label is your friend here because it lays out brightness, energy cost, life, light appearance, and wattage in one place. :contentReference[oaicite:11]{index=11}
Mistake 3: forgetting the room’s environment. Bathrooms, laundry spaces, and covered outdoor spots can need dry-, damp-, or wet-location suitability depending on the exact spot. If you ignore that, you can end up replacing a perfectly nice-looking light too soon. Fast fix: check the product listing before you fall in love with the design. Current ENERGY STAR listings clearly show special features such as damp-location or wet-location suitability on some models. “`
How to shop for the right flush mount in about 10 minutes
- Measure the room twice. Write down length, width, and ceiling height.
- Run Formula 1. Get your starting diameter in inches.
- Check ceiling height. If you are around 8 feet or lower, keep the profile low.
- Run Formula 2 if the room is task-heavy. Kitchens, baths, and utility spaces deserve the extra minute.
- Read the label and listing. Compare lumens, not just watts. Check dimming and location rating.
- Use rebates if available. EPA’s current Rebate Finder can point you to local offers on qualifying products. :contentReference[oaicite:13]{index=13}
“`
This order works because each step reduces a different kind of risk. The measurement step protects the room’s look. The lumen step protects everyday usability. The label step protects your budget and energy bill. The rating check protects durability and safety. Once you use that sequence once or twice, buying ceiling lights stops feeling random and starts feeling easy. “`
Six useful links that help you check size, brightness, labels, and savings
- DOE guide to lumens and the Lighting Facts label — a plain-English page that helps you compare brightness, bulb life, light appearance, and yearly operating cost before you buy.
- DOE LED lighting overview — a practical explanation of why LEDs save energy, last longer, and are now the default choice for most home fixtures.
- ENERGY STAR Certified Light Fixtures Product Finder — a live product search tool where you can compare qualified fixtures and see current performance details like lumens, watts, efficacy, and special features.
- ENERGY STAR Rebate Finder — a free tool to check whether your ZIP code has utility or partner rebates for efficient lighting and related home upgrades.
- FTC Lighting Facts label guidance — the clearest official explanation of what appears on bulb packaging and why lumens matter more than watts when you shop.
- Wikipedia’s lumen entry — a quick refresher on what a lumen is, plus the easy distinction between lumens and lux if you want the simple science behind brightness.
Your final decision rule
If you want the simplest possible answer, use this:
First, fit the room. Use room length + width to get the starting diameter. Second, fit the ceiling. Keep the profile low when the ceiling is around 8 feet or less. Third, fit the job. Use lumens and room function to decide whether one flush mount is enough or whether you need task lighting too. That three-part check is what turns “looks about right” into “actually works every day.” “`
And here is the most human part of the whole guide: you do not need a designer’s eye to get this right. You just need a tape measure, two simple formulas, and the patience to check the label before checkout. Do that, and your next flush mount will feel balanced when you walk in, comfortable when you live under it, and efficient when the bill arrives. As of March 13, 2026, the product and policy tools from DOE, EPA, and FTC make that easier than it used to be, especially if you use lumens, qualified-product search, and rebate lookup together. “`