
You know that moment: you flip on the light, look up, and suddenly notice a dusty ring, bug specks, greasy haze, or a cloudy glass shade that makes the whole room feel dull. It is annoying because the mess sits right above you, it looks harder than it should be, and one bad move can mean a wobbling chair, a broken bulb, or cleaner dripped into the socket. The good news is that cleaning a ceiling light is usually simple once you do it in the right order.
Key takeaway: the job is less about scrubbing hard and more about staying safe, using the right amount of moisture, and stopping dirt before it gets baked on. Current public guidance from OSHA, ESFI, EPA, DOE, CDC, and the National Institute on Aging all point in the same practical direction: use stable access equipment, avoid electrical hazards, do not spray atomized cleaner into electrical parts, let bulbs cool before handling, and take extra care in homes where an older adult might be tempted to do overhead cleaning alone.
If you want the short version before you start: turn the light off, let the bulb cool, set up a stable ladder, dust first, remove washable shades if the fixture is designed for that, clean the glass or plastic with mild soap and water, wipe the base carefully with a barely damp cloth, dry everything fully, and only then put it back together. That routine works because dry dust comes off fastest when you do not smear it with liquid, and electrical parts stay safer when moisture stays on the cloth instead of going into the fitting. ESFI specifically warns against foggers, sprays, and other atomized cleaning agents on electrical equipment unless the manufacturer says otherwise.
Why fandeliers need special attention
If you have a fandelier (a ceiling fan with a chandelier-style light fixture), you’ve got a unique cleaning challenge. These fixtures combine the dust-catching complexity of a chandelier with the moving parts of a fan, making them dust magnets that require careful handling. Unlike standard ceiling fans, fandeliers often feature delicate crystals, intricate metalwork, and multiple light sources that need individual attention.
According to southernliving.com, crystal elements on fixtures like fandeliers require special care to prevent water spots and maintain their sparkle. lightenify.com notes that fixtures with both fan and lighting components need extra safety precautions since you’re dealing with two electrical systems in one unit.
Why cleaning a ceiling light works better when you think in 3 simple levels
Most ceiling lights only fall into one of three cleaning levels. Level 1 is dry dust: the shade looks gray, but not sticky. Level 2 is a damp wipe: fingerprints, bathroom film, or a little kitchen residue. Level 3 is a wash-and-dry job: removable glass domes, greasy kitchen globes, or dead-bug buildup around the rim. When you sort the fixture this way, you stop over-cleaning. That matters because too much moisture and too much twisting are what create many avoidable problems.
| Method | Best for | Typical time | What you actually do |
|---|---|---|---|
| Dry dust | Bedroom, hallway, living room lights with loose dust | 3-5 min per fixture | Microfiber cloth or soft duster, then a final dry buff |
| Damp wipe | Bathroom film, fingerprints, light grime | 6-10 min per fixture | Dust first, then wipe with a lightly damp cloth and dry right away |
| Remove and wash shade | Kitchen grease, cloudy globes, bug buildup | 15-25 min per fixture | Take down removable parts, wash with mild dish soap, dry fully, reassemble |
Those times are planning estimates for regular homes, not lab measurements. They are useful because overhead chores always feel longer than they are. Once you know whether your light is a 5-minute dust job or a 20-minute wash job, you are much less likely to rush and do something clumsy.
What you need before you climb even one step
You do not need a fancy kit. You need the boring basics that keep the job controlled: a stable step ladder or platform ladder, two microfiber cloths, a bowl of warm water, one small drop of mild dish soap, a dry towel, and a small container or zipper bag for screws or finials. If your light has a glass dome, keep one hand on the glass while loosening the fastener with the other. If the fixture is above stairs, above a bathtub, or on a very high ceiling, skip the DIY version and book help. That is not laziness; that is smart risk control.
OSHA’s current ladder guidance says to inspect the ladder before use, avoid electrical hazards, and avoid metal ladders near exposed energized electrical equipment. CDC’s ladder safety page adds that many ladder injuries happen at home, and notes that incorrect setup is a big cause of falls; for extension ladders, about 40% of cases involve the ladder sliding at the base from the wrong angle.
If an older adult in your home says, “I’ll just grab a chair and do it quickly,” that is the moment to step in. CDC says over 14 million U.S. adults age 65 and older report falling each year, and NIA says more than one in four older adults fall annually. Cleaning one ceiling light is never worth a fall.
Easy tool-acquisition tip: if you are missing anything, search a hardware store or online shop for “fiberglass step ladder,” “microfiber cloth,” and “soft extendable duster.” You do not need a specialty cleaner unless your fixture manufacturer asks for one.
7 smart steps to clean a ceiling light without making a mess
- Turn the light off and give it time to cool. This sounds obvious, but it is where many problems begin. A hot bulb feels fine until you grab it, twist too hard, or get a damp cloth too close. EPA’s current CFL guidance says to switch off and allow a working CFL to cool before handling, and to hold the plastic or ceramic base instead of the glass tubing. DOE’s consumer lighting guide also notes that LEDs are cool to the touch compared with CFLs or incandescent bulbs, which is one reason many homes switch when they already have the shade off.
- Clear the floor and set the ladder squarely. Move rugs, baskets, and anything you could step on while climbing down with the shade in your hand. Face the ladder straight on; do not reach from the side. OSHA says to maintain three points of contact while climbing and to keep slippery material off ladder rungs, steps, or feet.
- Dust first, always. Use a dry microfiber cloth or soft duster on the outside before you touch water. This is the simplest trick in the whole article, and it saves you from turning loose dust into gray paste. On pendant lights or fan-light kits, dust the top rim too. That hidden ring is often where most of the dirt sits.
- Remove washable parts only if the fixture is clearly designed for that. If there is a center finial, a rim, or clips that obviously release the shade, take it down slowly. Put small parts in a bowl right away. If the canopy, wiring, or mounting hardware has to be disturbed, stop. ESFI’s “Test Before You Touch” guidance says simply shutting off power is not enough when you are dealing with circuits; hazardous conditions can still exist, and the circuit should be tested before contact. That is professional-territory thinking, and it matters if you are tempted to “just open it up a little.”
- Wash glass or plastic shades gently. Warm water plus a small drop of dish soap is usually enough. Let the shade sit for a minute if kitchen grease is present, then wipe with your hand or a soft cloth. Skip abrasive pads. Plastic covers scratch and go cloudy fast. Rinse lightly and dry fully. If you are dealing with bathroom haze, a plain damp wipe followed by a dry cloth is often enough; you do not need heavy cleaner for every job.
- Wipe the fixture base with a barely damp cloth, not a sprayed-on mist. This is the big one. Do not spray cleaner upward into the light. Spray the cloth away from the fixture if you need to, then wipe the non-electrical surfaces. ESFI’s current cleaning guidance says not to use sprays, foggers, or other atomized cleaning agents on electrical equipment components unless the manufacturer specifically says you can.
- Reassemble only when everything is completely dry. No “almost dry.” No “good enough.” A dry shade goes back on more cleanly, and you do not trap moisture inside the fixture. Tighten snugly, not aggressively. Then turn the light back on and check for even brightness, no wobble, and no fingerprints on the inside.
Key takeaway: if you remember only one sequence, remember this one: off, cool, ladder, dust, wash, dry, reassemble. It keeps you out of most trouble because it matches the way dirt and risk build up in real life.
3 real-life situations you are likely dealing with right now
Kitchen dome light: this is the classic “why is it still yellow after I wiped it?” problem. The answer is usually airborne cooking grease mixed with dust. A dry wipe alone will smear it. You will get a better result by removing the glass, washing it with warm soapy water, drying it fully, and wiping the base with a barely damp cloth. This is the room where a 15-minute deep clean makes the biggest visible difference.
Bathroom ceiling light: the mess here is usually humidity film, lint, and maybe a little hair spray residue. You often do not need a full sink wash. Dust first, then wipe the cover lightly, then dry it. If the fixture sits above a tub or shower, stop and think about footing. Wet surfaces plus overhead cleaning are a bad mix.
Bedroom or hallway flush mount: this is often the easiest win. Dry dusting every few weeks keeps the globe from getting grimy enough to require removal. It feels small, but it works because dirt that never gets sticky comes off in seconds.
High stairwell or entry light: this is where people talk themselves into a risky shortcut. Don’t. If you need to lean, twist, or work on steps that are not level, the cheapest solution is not doing it yourself. It is hiring somebody with the right setup.
| Room | Best cleaning rhythm | Most common mess | Best method |
|---|---|---|---|
| Kitchen | Every 2-4 weeks | Grease + dust | Remove and wash shade |
| Bathroom | Every 3-6 weeks | Humidity film + lint | Damp wipe, then dry |
| Bedroom/Living room | Every 4-8 weeks | Loose dust | Dry dust or quick damp wipe |
| Entry/Stair area | Monthly visual check | Bugs + dust | Clean only if safely reachable |
Those intervals are practical routines, not official mandates. They work because dirt behaves differently by room. Grease grabs dust fast, humidity leaves film, and dry rooms mostly collect loose particles.
2 simple formulas that make this job easier in everyday life
Formula 1: Estimate how long your cleaning session will take.
Total cleaning minutes = (easy fixtures × 5) + (washable greasy fixtures × 18) + 10 minutes setup
Plain-language meaning: count your quick dust jobs, count your true wash jobs, then add ten minutes for moving the ladder, filling the bowl, and putting tools away. Example: if you have 4 easy bedroom lights and 1 greasy kitchen dome, your estimate is (4 × 5) + (1 × 18) + 10 = 48 minutes. Suddenly the task feels real, not vague. That makes it easier to start.
Formula 2: Check whether replacing the bulb while cleaning will save you money.
Yearly energy cost difference = (old bulb watts – new bulb watts) × hours used per day × 365 ÷ 1000 × electricity price per kWh
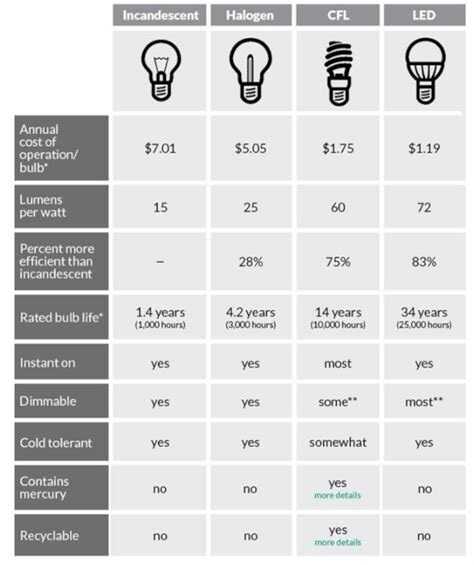
Plain-language meaning: take the watt difference between your old bulb and the one you want to use, multiply by how long the light is on each day, convert watts to kilowatt-hours, then multiply by your electricity rate. Example: swapping one 60W incandescent for one 9W LED used 3 hours a day at $0.16/kWh gives (60-9) × 3 × 365 ÷ 1000 × 0.16 = about $8.93 saved per year per bulb. DOE says residential LEDs use at least 75% less energy and last up to 25 times longer than incandescent lighting, so this is a very reasonable check to do while you already have the fixture open.
3 mistake stories that feel very normal, and how you avoid them
Mistake story 1: “I sprayed glass cleaner straight up because it felt faster.” The result is usually drips, streaks, and cleaner where you do not want it. The fix is easy: spray the cloth away from the fixture, then wipe. ESFI’s current guidance against atomized cleaning agents on electrical equipment is exactly why this matters.
Mistake story 2: “I stood on a dining chair for thirty seconds.” Chairs feel stable until you reach sideways. OSHA and CDC ladder guidance exist for a reason: overhead cleaning is safer when your base is meant for climbing and you keep your body centered instead of leaning.
Mistake story 3: “I twisted the old bulb by the glass while it was still warm.” That is how bulbs crack, especially older CFLs. EPA says to let a working CFL cool before handling and to hold the plastic or ceramic base, not the glass tube. If a mercury-containing bulb breaks, the cleanup steps change immediately. Air out the room for 5-10 minutes, shut off central HVAC if you can, scoop debris with stiff paper or cardboard, use sticky tape for tiny pieces, and avoid vacuuming unless broken glass remains after other cleanup steps.

When a ceiling light should be cleaned, deep-cleaned, or replaced
| What you see | Best move | Why | Typical next step |
|---|---|---|---|
| Dust only, light still bright | Quick clean | No sticky film yet | Dry dust now, damp wipe if needed |
| Cloudy globe, yellow grime, bug spots | Deep-clean | Dirt is blocking light output | Remove and wash the shade |
| Cracked shade, brittle plastic, rust, flicker, heat damage | Replace or inspect professionally | Cleaning will not solve wear or electrical risk | Check the model, manual, or an electrician |
| Broken CFL or other mercury bulb | Stop and switch to cleanup protocol | Regular sweeping or vacuuming can be the wrong move | Follow EPA broken-bulb steps |
If the fixture flickers after cleaning, smells hot, or has brittle wiring insulation, this is no longer a housekeeping problem. It is an electrical problem. NFPA reports that home fires involving electrical distribution and lighting equipment caused an estimated average of 430 civilian deaths and 1,070 civilian injuries per year in 2015-2019, with attic or ceiling origin accounting for 11% of those fires. That is why “just wipe it and see” is not the right answer once you move from dirt into damage.
Helpful links you can actually use today
- OSHA Portable Ladder Safety QuickCard — a plain, practical checklist on ladder setup, three points of contact, and avoiding electrical hazards before you climb. :contentReference[oaicite:13]{index=13}
- CDC/NIOSH Ladder Safety — easy-to-read ladder facts, common fall causes, and why home ladder use deserves more respect than most people give it. :contentReference[oaicite:14]{index=14}
- ESFI Cleaning and Disinfecting Guide for Electrical Equipment — useful for one key rule: do not spray atomized cleaner into electrical equipment unless the manufacturer says it is okay. :contentReference[oaicite:15]{index=15}
- ESFI Test Before You Touch — especially helpful if you are tempted to remove covers or go beyond surface cleaning into anything involving wiring. :contentReference[oaicite:16]{index=16}
- DOE LED Lighting — a practical consumer page explaining how much less energy LEDs use and why they are often the better bulb to install during a cleanup session. :contentReference[oaicite:17]{index=17}
- EPA: Cleaning Up a Broken CFL — the page you want if a mercury-containing bulb breaks while you are cleaning, including airing out the room, debris pickup, and disposal basics.
The part most people skip: making the next cleaning easier
Once your light is clean, give yourself one tiny system so it stays that way. Wipe bedroom and hallway fixtures when you dust ceiling fans. Check bathroom lights when you clean the mirror. Wash the kitchen globe on the same day you degrease the range hood filter. That kind of pairing works because your brain stops treating the job as a separate event. It becomes part of another task you already do.
There is also a nice side benefit: clean shades simply look brighter. And if you swap out a hot old bulb while the cover is already off, you can make the fixture easier to handle next time too. DOE says lighting accounts for about 15% of an average home’s electricity use, and its consumer guide says LEDs use up to 90% less energy than incandescents in that document, while the Energy Saver page says residential LEDs use at least 75% less energy and can last up to 25 times longer. You do not need to turn this into a home-audit project; just notice the obvious opportunities while you are already up there.
Final answer: the easiest reliable way to clean a ceiling light
If you want your ceiling light to look better fast, do this: switch it off, let it cool, use a real ladder, dust it dry, remove the shade only if it is meant to come off, wash that shade with mild soapy water, wipe the base with a cloth instead of spraying cleaner upward, dry every part completely, then reassemble. That method is simple because it matches how dust, grease, heat, and electrical risk actually behave in a real home.
And here is the bigger win: once you clean one ceiling light the calm, careful way, the rest stop feeling like a chore you need to dread. You know what kind of mess you are dealing with. You know how long it will take. You know when to stop and call a pro. That is what makes this job easy to do, useful, convenient, and worth the small effort.